


Today I am going to try and recreate some of my favorite elements from the look using an iridescent highlighter. To start you will want to pick a highlighter that is 1-2 shades lighter than your natural color. I choose TEMPTU's AIRpod Highlighter in Champagne. It is pretty light but I love the soft shimmer in the hue.

STEP 1: Lower Power
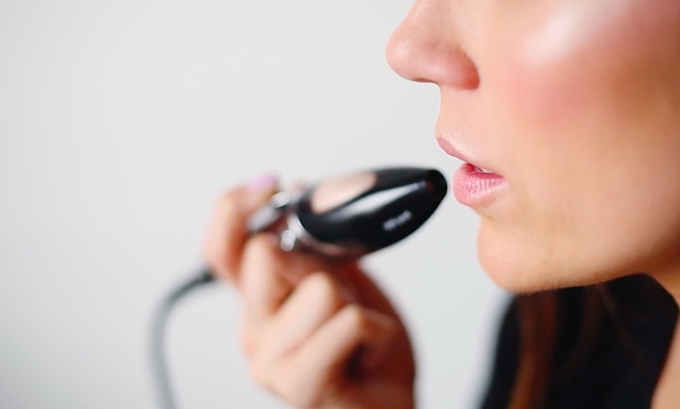
After you have applied your foundation and blush drop the power on the TEMPTU system to 2 or 3 o'clock. You will be applying the highlighter about 1 to 2 inches from your face, so you want the lower pressure so it doesn't get blotchy.

Step 2: Highlight
You will be highlighting five areas on your face to create definition and glow:
* Brows: Highlight below the brow bone along the hairs of your brow
* Corner of your Eye: Apply a small centimeter circle in the inner corners of your eye to attract light to your eyes
* Bridge of your Nose: Depending on the shape of your nose, will determine the width of the highlight. If you have a wider nose apply a thin straight line down the center of your bridge to slim the width. If you have a slim nose apply a wider highlight to exaggerate the width.
* Cheeks: Cheeks can be a 3 step process. After you have applied blush to the rose of your cheek, highlight above your blush from the rose to the outer corner of your eye almost creating a semi circle. If you want to accentuate the bone more and create depth apply a bronzer below the blush in the shadow of your cheek bone.
* Lips: We all love the look of a soft plump lip! Highlight around the outer rim on your lips before you apply liner and this will create light and volume. You can also apply a splash of highlight to the center of your bottom lip to create additional plumpness.
Step 3: Tada you are done!
The highlights will emphasize your features for a natural glow.

Do you TEMPTU? The TEMPTU airbrush system really makes highlighting so much easier and more professional looking. Right now you can click here to get a special discount on the starter kit.
Below is a basic breakdown on where to highlight:

For a more thorough tutorial on using the TEMPTU Airbrush System to create highlights see my how to video below:
[Video: Thanks to Tribe Federation]
If you have any questions feel free to leave a comment and I'm happy to answer :)
Be sure to vote for my look on Fashion Indie for a chance to win an all expense paid trip to NYC for the ultimate beauty make-over.
Thanks for your support!
XOX,
Christine


I have always wanted to try airbrush. Your makeup looks great!
ReplyDeleteYou look gorgeous!! I have heard a lot of great reviews on this. I should try it out!!
ReplyDeleteXo Ash
Sincerely Miss Ash
How do you recommend choosing a foundation color for this machine? It is tricky trying to order a color to match yourself online...
ReplyDeleteHi Jessica, I struggled with the same thing so I choose two shades when I ordered (natural and honey). I would suggest maybe guessing what two shades seem the closest and trying each out to see what fits best with your complexion. One of the shades I got was a little dark but I ended up keeping it because I knew I would use it in the summer :) Hope that helps!
DeleteWow it looks really good:)<3
ReplyDeletewww.shallwesasa.com
I have never been curious about airbrushing, but your makeup looks so natural and pretty. How long did your whole look take? Did you have to practice with it before?
ReplyDeletexo Adri
www.adrilately.blogspot.com
Aw thanks Adri! Now it takes me about 5 minutes from start to finish (foundation/blush/highlighter) that is a week into using it. The first day I got it took some getting used too. I sprayed a huge blob of blush on my face because I didn't know how to use the trigger :) I'd say it's like 30 mins of playing around with it the first time around and then it gets so quick the more you use it and you get a lot better at it. I use it everyday now. I love it!
DeleteIt looks so much simpler now. Thanks for sharing!
ReplyDeleteKylie Rae
What kind of eyeshadow are you wearing? It's gorg!
ReplyDeleteWhat kind of eyeshadow are you wearing? Looks gorg!
ReplyDeleteHi Kristi,
DeleteIt's the Champagne Highlighter I used in the tutorial. I did two coats of it to create a bright iridescent shadow :)
I love the final look! I've always been a little iffy about airbrushing because I was afraid I'd look like an umpa lumpa but the colors look very soft and realistic. Thanks so much for sharing!
ReplyDeleteMegan Star - Beauty Brawler
I love the makeup, it was perfect. Can I say that after watching this video, I will make sure that I come to your blog everyday. Your fashion sense is not already great but you seem so sweet.
ReplyDeleteI have been wanting to try this!
ReplyDeleteHaley
haleyvalerie.com
I've been wanting to try this too! You look absolutely beautiful!
ReplyDeleteShannon
http://GBOfashion.com
You look so gorgeous in these pictures! I'm loving this tutorial!
ReplyDeletePaige
http://www.thehappyflammily.com
Great tutorial! Love this!
ReplyDeleteThe Style Storm
<3, Christina
One of the best video tutorials I've ever seen! Thank you for sharing. I've always been so intimidated by airbrushing but it doesn't look as complicated as I used to think. xo
ReplyDeleteAH! Dying for an airbrush machine!!!!
ReplyDeleteYou've talked me into it ;)
I am SO glad I found your blog :) SO cute!!!!
XOXO,
Whitney
The Retail Therapist